QuickBooks is a powerful accounting software that many businesses rely on to manage finances, track expenses, and handle payroll. However, when multiple users need to access QuickBooks simultaneously, particularly in a business environment, installing QuickBooks on a terminal server can provide significant benefits. A terminal server allows several users to access QuickBooks remotely, saving on licensing costs and ensuring that multiple people can work on the same file without conflict.
In this 2025 guide, we will walk you through the process of installing QuickBooks on a terminal server. We will cover everything you need to know, including prerequisites, step-by-step instructions, and troubleshooting tips to ensure a smooth and successful installation.
What is a Terminal Server?
Before we dive into the installation process, let’s first clarify what a terminal server is and why it’s beneficial.
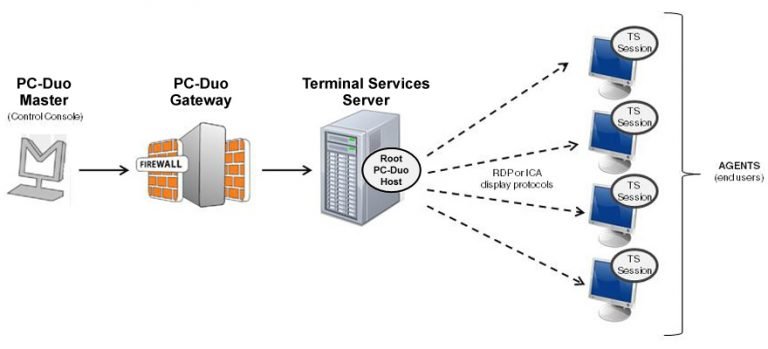
A terminal server allows multiple users to connect to the same machine remotely and run software applications, such as QuickBooks, as if they were sitting right in front of the computer. Unlike local installations where each user has to install QuickBooks on their own system, a terminal server centralizes the installation. Users access the application through a remote desktop connection (RDP), and all processing happens on the server. This setup is particularly useful for businesses with multiple employees working from different locations.
Benefits of Installing QuickBooks on a Terminal Server
- Centralized Management: With QuickBooks installed on a terminal server, all your company files, software updates, and configurations are stored in one location. This eliminates the need to install and maintain the software on every individual workstation.
- Cost Efficiency: Instead of purchasing multiple licenses for each user, businesses can buy fewer licenses and allow users to access the software through the terminal server.
- Remote Access: Users can access QuickBooks from anywhere with an internet connection. This is particularly helpful for businesses with remote teams or for those who need to work on the go.
- Increased Security: With all data stored on the server, businesses can implement centralized security measures, such as regular backups, restricted access, and encryption.
- Enhanced Performance: With the server handling the processing, users’ local machines can run faster, and performance is more stable when many users are working on the same file at the same time.
Prerequisites for Installing QuickBooks on a Terminal Server
Before proceeding with the installation of QuickBooks on your terminal server, make sure your system meets the following prerequisites:
1. Hardware Requirements for Terminal Server
- CPU: A multi-core processor (preferably Intel Xeon or equivalent).
- RAM: At least 8GB of RAM, with 16GB or more recommended for multiple users.
- Storage: At least 100GB of free disk space for QuickBooks and company data files. Solid-state drives (SSDs) are preferred for better performance.
- Network: High-speed internet connection to support multiple users accessing the server remotely.
2. Software Requirements for Terminal Server
- Windows Server Operating System: QuickBooks must be installed on a server running a compatible version of Windows Server. Versions such as Windows Server 2019, 2016, or 2012 R2 are ideal.
- QuickBooks Desktop Version: Ensure that you have the latest version of QuickBooks Desktop. You can use QuickBooks Pro, Premier, or Enterprise, depending on your needs.
- Remote Desktop Services (RDS): For users to access QuickBooks remotely, you need to have Remote Desktop Services (RDS) installed and configured on your server.
- Licensing: Ensure you have the appropriate licensing for both QuickBooks and Remote Desktop Services. Each user connecting remotely will require a Remote Desktop Client Access License (CAL).
3. Backup and Data Protection
- Backup System: Before installing QuickBooks on the terminal server, make sure you have a reliable backup system in place to protect your QuickBooks company files.
- Antivirus/Firewall: Ensure that the server is protected by a reputable antivirus and firewall solution to prevent security threats.
Step-by-Step Guide to Installing QuickBooks on a Terminal Server
Now that you’ve ensured your system meets all the prerequisites, let’s move on to the actual installation process.
Step 1: Install the Operating System (Windows Server)
If your terminal server does not already have the necessary version of Windows Server installed, start by installing it.
- Install Windows Server: Use a bootable USB drive or DVD to install the Windows Server version you plan to use.
- Configure Server Settings: After installation, configure the necessary server settings, including network configuration, user accounts, and remote access settings.
- Install Remote Desktop Services (RDS): Use the Windows Server Manager to install RDS, allowing remote users to connect to the server.
Step 2: Install QuickBooks Desktop on the Terminal Server
- Download QuickBooks: Visit the official QuickBooks website and download the installer for your version (Pro, Premier, or Enterprise).
- Run the Installer: Once the download is complete, run the installer and follow the on-screen instructions.
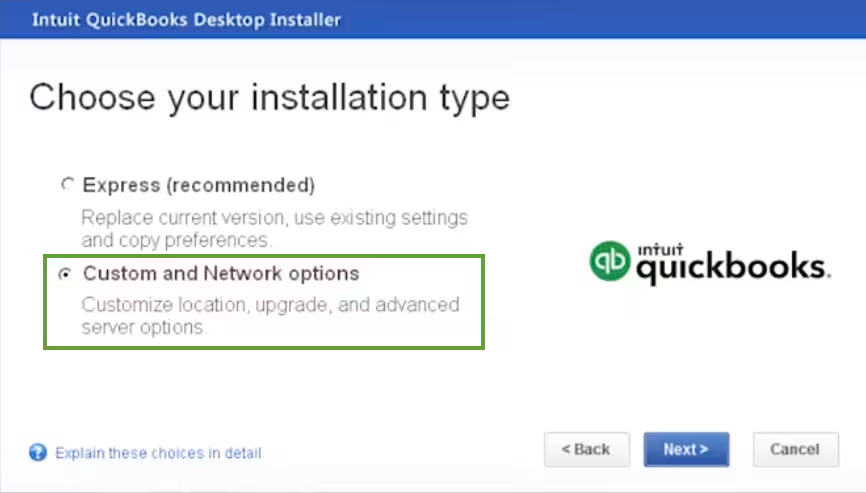
- Choose Custom Installation: During the installation process, select “Custom Installation” to specify that QuickBooks should be installed on the terminal server.
- Select the Location: Choose a location on the server where QuickBooks should be installed. It’s recommended to install QuickBooks on the server’s main hard drive for performance reasons.
- Complete the Installation: Continue with the installation process until it’s complete. The installer will configure QuickBooks for multi-user mode if needed.
Step 3: Configure Remote Desktop Access
Now that QuickBooks is installed, you need to configure remote desktop access for your users.
- Enable Remote Desktop: In the Windows Server settings, enable Remote Desktop and configure the settings to allow multiple users to log in.
- Create User Accounts: Create individual user accounts for each person who will be accessing QuickBooks remotely.
- Assign Permissions: Ensure each user has the necessary permissions to access QuickBooks and their respective company files.
- Install RDP Client: On each user’s local machine, install the Remote Desktop Protocol (RDP) client and configure it to connect to the terminal server.
Step 4: Set Up QuickBooks for Multi-User Mode
For businesses with multiple users, configuring QuickBooks for multi-user mode is essential.
- Enable Multi-User Mode in QuickBooks: Launch QuickBooks and open your company file. From the menu, select File > Switch to Multi-user Mode.
- Configure QuickBooks Database Server Manager: Install QuickBooks Database Server Manager on the terminal server. This will allow QuickBooks to host the company files for remote users.
- Set Folder Permissions: Set the correct folder permissions to ensure users can access and edit the company files without issues.
Step 5: Verify Everything is Working
Once you’ve completed the installation and configuration, test the setup by logging in from multiple user accounts and accessing QuickBooks.
- Log In as a User: Use a remote desktop client to log in to the terminal server using the user credentials you created earlier.
- Test QuickBooks: Open QuickBooks and verify that the application works correctly. Ensure that users can access the company file, make changes, and process transactions without issues.
- Test Multi-User Mode: Have multiple users access the QuickBooks company file simultaneously to verify that the multi-user mode functions correctly.
Troubleshooting Tips
If you encounter issues during or after the installation, here are some troubleshooting tips:
- Slow Performance: If QuickBooks is running slowly for users, check the server’s hardware specifications and network bandwidth. Upgrading the server’s RAM and using SSDs for storage can significantly improve performance.
- User Access Problems: If users are having trouble logging in, ensure that Remote Desktop Services is configured properly and that each user has the correct permissions.
- QuickBooks Licensing Issues: Ensure that you have purchased the correct number of licenses for QuickBooks and Remote Desktop Services. Each user connecting to the terminal server needs a valid QuickBooks license.
- File Access Errors: If users experience errors while accessing the company file, verify that the file permissions are set correctly and that the company file is stored in the appropriate location on the server.
Installing QuickBooks on a terminal server is a smart solution for businesses with multiple users who need remote access to QuickBooks. By centralizing the installation, you can reduce costs, improve security, and streamline the management of QuickBooks and your company data.
By following the steps outlined in this guide, you can successfully install QuickBooks on a terminal server, set up remote access for your team, and ensure smooth operation of the software for all users. Keep in mind that regular maintenance, backups, and performance monitoring are essential for ensuring long-term success.